E4 | Lexington Modern | Engineered for Accessibility
Season 45 Episode 4 | 23m 42sVideo has Closed Captions
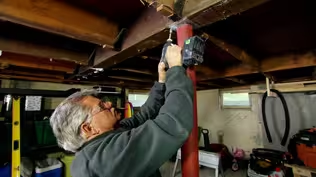
A lally column is replaced by a larger ridge beam for an open kitchen and dining area.
Great progress is being made on the project house. The primary addition is being framed and the rooms are starting to take shape. A sound deadening wall is built. A lally column is removed and a larger ridge beam is installed to create an open kitchen and dining area. The homeowners choose hardscape finishes based on 3D renderings. An accessible designed bathroom is toured.
Problems playing video? | Closed Captioning Feedback
Problems playing video? | Closed Captioning Feedback
Funding for THIS OLD HOUSE is provided by The Home Depot and Renewal By Andersen.
Support provided by:

E4 | Lexington Modern | Engineered for Accessibility
Season 45 Episode 4 | 23m 42sVideo has Closed Captions
Great progress is being made on the project house. The primary addition is being framed and the rooms are starting to take shape. A sound deadening wall is built. A lally column is removed and a larger ridge beam is installed to create an open kitchen and dining area. The homeowners choose hardscape finishes based on 3D renderings. An accessible designed bathroom is toured.
Problems playing video? | Closed Captioning Feedback
How to Watch This Old House
This Old House is available to stream on pbs.org and the free PBS App, available on iPhone, Apple TV, Android TV, Android smartphones, Amazon Fire TV, Amazon Fire Tablet, Roku, Samsung Smart TV, and Vizio.
Keep Exploring

This Old House Insider Newsletter
Get This Old House exclusive stories, tips, and behind-the-scenes information delivered right to your inbox every month.Providing Support for PBS.org
Learn Moreabout PBS online sponsorshipKevin: Today on "This Old House"... Charlie: And this new space is going to be our kitchen and dining room, completely open, no walls.
We have to take this lally column out.
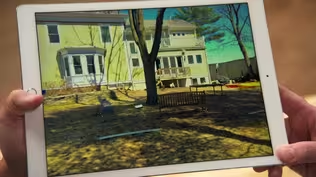
Jenn: And I'll reveal my landscape design plans in 3-D, complete with retaining wall, patio and fire pit.
Michelle: It looks really beautiful.
♪♪ ♪♪ Man: Ahh.
That's it.
♪♪ ♪♪ Kevin: Hey there.
I'm Kevin O'Connor.
And welcome back to "This Old House" and to our project here in Lexington, Massachusetts.
You can see that Charlie and these guys have made a lot of progress and primarily by separating this house into two.
So we've got the original 1960s building right here, that brick facade to the right.
That has been detached from the garage because they took out the center of this entire building.
Now, over here on the garage, they're trying to reduce the scale of this building.
So this front roofline, that's been taken off and the slope is eventually going to come down and it'll make the tall second story be back further, giving that building sort of less importance.
The two are going to come back together with a new center entranceway.
There's going to be an angled roofline, lots of glass going from the garage over to the original building, and it's going to give us a nice, proper entryway.
So out back, we've got some new space.
Now, the original house ended right here, but all of this is new.
Over our newly poured foundation, we've got the deck down and we've got the framing going up.
So lots of conventional lumber, some engineered lumber here for the headers.
And we've got two bedrooms going in.
So we've got one bedroom for the youngest son here.
He's got a bathroom just off of that.
And then on the other side of this wall, we have got the bathroom that is part of the primary suite.
Now, lots of conventional lumber throughout, but here you can see engineered lumber.
And that's because there's a lot of tile going into these two bathrooms.
So upgrading to the super straight 2x4 is going to save us a lot of trouble later.
Hey, Tim.
Tim: Good morning, Kevin.
Kevin: On this side of the primary suite, we've got the bedroom -- big, wide open space.
And we've got a couple features to this addition to keep with that modern aesthetic of the house.
The first is there is a 2-foot cantilever right here running the length, hanging over the foundation all the way to our back wall right here.
Now, this is 50 feet corner to corner, framed conventionally.
And that was all lifted as one.
Not so bad on this side because it's mostly air and that's because we've got over 10 feet of glass going this way and about 16 feet going this way.
So you'll be able to take in the beautiful views of the backyard.
And this high ceiling is created in part because it is pitched from the high part and downward into the center of the house, another nice modern aesthetic.
So, Tim, I get the straight engineered lumber there, but why are you staggering them?
Tim: We're building a sound-deadening wall to isolate the primary bedroom from the bathroom.
Kevin: Gotcha.
Okay, well, I will give you a hand.
These have been cut to length, I presume.
Tim: Yes, they are.
Kevin: Alright.
This one here.
Oh, yes, they have.
Nice job.
Okay, so how is this going to help us deaden the sound the way you're building this wall?
Tim: So, to get the sound isolation from one room to the other, we've separated these studs, so this sound does not travel from this stud into this room, this into this room.
Kevin: Which would do easily if these were touching it, there was two sides right here?
Tim: Yes.
Correct.
Kevin: Yeah.
Okay.
Tim: And then by taking mineral wool, we're able to take a batt between this stud all the way up, creating sound deadening between this stud.
Then we can take the mineral wool from this room, this batt all the way up here, creating that, and this becomes continuous all the way down.
Kevin: Mineral wool's great for sound attenuation, right?
So we get the separation, we get the mineral wool, we get it right down the middle.
Tim: Absolutely.
Kevin: I love it.
That's going to be a nice feature for the bedroom, separated from the bathroom.
Somebody gets up early and showers, they'll never know it.
♪♪ Tom: Bring that in tightly.
Charlie: Hey, guys.
Tom: Hey, Charlie.
Charlie: Hey.
So, our problem here is this lally column, which was buried in a wall before, and this new space is going to be our kitchen and dining room, completely open, no walls.
We have to take this lally column out.
Tom: And this lally column is doing a lot.
It's actually carrying the load of the roof along with that beam up there.
And because of that new design, the architect has engineered a new beam that is much larger to go in its place.
It will go the whole length here.
That's like 46 feet if I'm right.
Charlie: That's right.
Tom: Yeah.
So the issue is get this out so we can install a new ridge beam.
To take the load off the column and keep the roof up, we need to build temporary walls on either side of the ridge beam first.
Then we can cut the column and the ridge beam out.
We put a temporary plate on the ground, a double plate under the rafters, and we spaced double studs, carrying studs, about four feet apart.
We take a measurement from the double plate down to the shoe, and we add about 3/4 inch of that length.
So when we put these in, they'll go in tight and we pull them in, bowl them in until they go up plumb.
When they come in, they actually pick the roof up at the same time.
When we put the second one into it, we now create a post that's stronger than a single 2x6.
Okay, now let's take out the lally column.
Charlie: Alright, let's put a score around this column.
Tom: Yeah.
Now, this is just a steel pipe that's filled with concrete, and we're just using a metal cutting tube cutter, or pipe cutter.
Charlie: Tighten up... Tom: Right.
Gradually go in and all of a sudden, that should snap, and then it'll just pop it off of the concrete.
Charlie: Yeah.
There it goes.
Tom: That's it.
♪♪ Charlie: Sent Greg and Matt up on the roof to start cutting back the roof shingles above the ridge here.
Tom: Okay.
Charlie: They're gonna take off a couple of boards.
Tom: Yeah.
Alright.
So I put a mark around the beam right here.
I want to keep it away from this wall first to see if we get this section down, and then take a look and see what we've got.
Alright, so now what I'm going to do is I'm going to make another cut further away.
So when this comes down, it won't get hung up on itself.
♪♪ Charlie: All set.
Tom: Alright.
Here it comes.
Here we go.
[ Reciprocating saw whirring ] Charlie: Alright.
Tom: Okay.
One second.
Alright.
That is one solid beam.
Charlie: Sure is.
Looks like we only have about 38 more feet to go.
Tom: [ Chuckling ] Yeah.
Well, it shouldn't take too long.
♪♪ Jenn: These are perfect.
It's time for homeowners Billy and Michelle to make some decisions on the hardscape.
So I brought in someone to help them visualize my design ideas.
Hey, Billy.
Hey, Michelle.
I want you to meet my friend Mike Pray.
Mike: How you doing?
Billy: Welcome.
Mike: Nice to meet you.
Michelle: Hi, there.
Good to meet you.
Jenn: So today, out front here, I want to talk about these retaining walls.
Right?
So we have to retain this grade behind me.
It's going to run -- There's a stone wall that's going to run all the way out this way, and it's going to be tiered with a planting bed in between.
But what I want to discuss with you is how they're going to be built, because there's two ways.
We could either use a natural stone just like the actual stone themselves and build the wall, or we could be more precise and use a block wall and take the veneer and apply it to the front.
So it would just go right on like that.
And I think with the modern look that you're trying to achieve here, to catch all the rooflines and funky angles, you're going to have a cleaner, cleaner layout if we use the block wall.
What do you think?
Michelle: I think that sounds like a great idea.
Jenn: Okay, so we have four samples of veneer.
You want to run through them?
Mike: So, I brought you four different options today.
The first one is a blue stone out of Pennsylvania that's cut into a thin veneer.
The next three are all going to be granite.
Difference being is it's all based on color.
This one right here is going to be predominantly darker gray.
This is cut by a local cutter.
Your next option right here is going to be a mix between several different quarries of grays and browns, as you can see here, and tans.
Your next option is going to be predominantly gray with minor striations through it.
Michelle: Well, I think they all look like really great options.
I think they can work, but I think we really want to talk about the aesthetics that are going to make the most sense.
And given we're going to have this dramatic front of the house now with a lot of detail, I think it makes a sense to do something that's kind of clean and simple, complement the house, not compete with it.
Jenn: Exactly.
Michelle: Yeah.
So I would say for me, it's really a choice between the first one and the fourth one I think are going to be able to help us achieve that the most.
Jenn: So the blue stone and this granite on the end.
Mike: So, it gets even better.
I have -- I can show you right here.
Michelle: Great.
Mike: Here's option number one.
Michelle: Looks good.
Mike: And then here is option number four.
Michelle: Yeah.
Billy: Well, we like the one and four, but I think number four is going to be our choice.
Jenn: Okay.
Billy: We have a lot of different textures and with the mid-century modern, a lot of different lines and that's going to give a nice linear, horizontal space along the whole wall.
Jenn: I agree.
Mike: I definitely agree too.
It'll offer a good contrast between the paver options as well.
Jenn: Yeah, and it's going to blend in.
It's not going to be one solid color.
So I love that idea.
Michelle: Great.
Jenn: To the back.
There's a few more things I want to show you guys and talk about.
Okay.
So the retaining walls from the front continue down this way.
This is where the outdoor kitchen is going to be.
Over here is the hydrotherapy pool.
What I want to talk about are surfaces for the pathways and for the patio all the way from the front to the back of the house.
These are four of the samples that Mike brought.
Do you want to run through them?
Mike: So, I brought four different options today.
This is a gray and charcoal predominantly concrete paver.
A very uniform-gauge granite.
This is a gauge thermal bluestone.
It's all going to be 1 1/2 inches thick.
It's thermal blue.
And this is your natural cleft bluestone option.
So the difference between these two is the natural cleft right here versus this is just hit with a acetylene torch to make it pop, give it a little bit of texture.
Jenn: So they're both bluestone granite concrete pavers.
Michelle: Yeah.
Jenn: Anything jump out at you?
Michelle: Yeah, I mean, so again, some really great options that could work really well.
So for me, I really like the idea of the natural stone.
So maybe not the concrete paver, but when I think about the aesthetic of the house and we've got a lot going on again and so something that's going to be clean and simple, I think bluestone is going to be perfect.
Billy: Functionally, I think we're going to go with this one here because of the lack of cleft.
It's got some texture, but it's going to reduce the risk for slips, trips and falls with regards to the accessibility that we're making most of our decisions based on.
Mike: That's kind of where I thought you were going to go with this.
Jenn: Me too.
Because it's all one uniform surface and it's just going to carry all the way through.
Mike: I totally agree.
Offers a lot of character.
And here's an example of what that looks like at the home right now.
Jenn: Oh, cool.
Michelle: It looks really beautiful.
Let's go for it.
Jenn: Great.
Decision done.
One more to go.
I want to talk about the fire-pit area.
Michelle: Okay.
Jenn: Okay.
So this is part of your couch, right?
It's a sectional that's going to go all the way around the fire pit.
It's landed in this area, originally thought in the design it'd be nice to come out, but I feel like it's obstructing many things, like access around, views from in and out.
So this is a template of the five-foot diameter of your pit, right?
You want two feet probably in between the furniture and that.
Imagine all this furniture around.
It takes up a lot of real estate.
So another thing to consider is it is a fixed thing.
Charlie is going to plumb a gas line in, so we can't move it.
What do you think?
Michelle: Yeah, I mean, this is the first time we're seeing a setup like this.
And I think that you're right.
It takes up a lot more space than I was anticipating.
Jenn: Mm-hmm.
Michelle: And because we're wanting to leave it as open as possible, and of course, we're thinking about, you know, anticipating a motorized wheelchair navigating this space, it does feel very crowded.
Jenn: Well, so, I'm thinking of option two then, just in case you were going to think that because I was feeling the same thing.
So that's why we made this template.
Okay.
So I was considering moving it, the fire pit, down here.
This is where the edge of the hydrotherapy pool is.
And if we center it on there, have it at least 12 feet to the center of the pit, I think it's going to give us enough room for the sofa to go all around.
Then you clear up that real estate in there, bring it over, get into your yard a little bit more.
What do you think?
Billy: I like it.
I do have a concern for the grade.
We have the accessibility as our priority for everything, and this grade is going be a little bit too much maybe.
Jenn: So what this is going to do, we're going to -- it'll be all one level surface.
So, the front of the house all the way to the back patio, everything's the exact same grade.
We'll retain this with some boulders that we found during the excavation.
And then you could just plant around it and just soften it.
Some privacy plants over here.
Michelle: I think it'll work.
Jenn: Yeah.
Michelle: Great.
I mean, I like it.
I think we should do it.
Jenn: Great.
And then we can also talk about the outdoor kitchen next time.
♪♪ Charlie: I got it.
Yep.
Tom: You got it.
Charlie: Got it.
Got it.
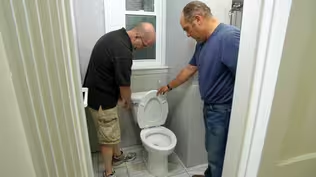
Richard: We're here in the new addition to the house.
And this is Caffrey's bathroom, an accessible bathroom.
You can see it's been framed in right here.
And here's where the curbless shower will go.
Now, there are many reasons for an accessible bathroom.
It could be mobility disability challenges like Caffrey has, but it also could be for aging in place.
Anytime we do one of these rooms, we want it to be obviously functional, safe, but we'd like it to look good too.
So we're off to visit with Jackie Dobson.
She's an accessibility expert hired by the homeowners to help consult on this project.
She's got a similar project to this that I think we can learn a lot from.
♪♪ [ Knock on door ] Jackie.
Jackie: Hi, Richard.
Richard: Nice to see you.
How are you?
Jackie: Good.
Glad to meet you.
Richard: Thanks for showing us around a little.
I hear you are the pro in residential access.
Jackie: I've been doing it for a while.
40 years.
Yeah.
Richard: Well, it's exciting to think about what we're going to do to help Caffrey and his bathroom.
Jackie: Yes.
Let me show you some of the things we did here.
Richard: Okay.
Okay.
Jackie: Actually, let's start with the door.
As you can see, this hallway is very narrow.
Richard: Yes.
Jackie: In this case, we did a 42-inch door so that a wheelchair can easily make it.
Richard: Oh, so you can negotiate the corner.
Jackie: There's a ratio that you can use.
And on this pocket door, you can see that there's a different button.
Often there's a little tiny button you have to push and you have to pull that little thing out.
Richard: Yes, I know.
Jackie: This one, you just push in and you can pull the door.
Richard: It's a pocket because you really couldn't do a swing door.
Jackie: No, no.
I often do do a swing door.
And there's factors with that.
In this situation, this one worked.
Richard: Okay.
That's great.
Jackie: Yeah.
And over here on the sink, this is a custom-designed sink.
There are about 10 different dimensions that we look at, and one is the height off the floor, of course.
Richard: Sure.
So be the right height to be able to have a wheelchair go underneath.
Right?
Jackie: Right.
But not so high that they're up too high when they're using it.
Richard: Yeah.
Jackie: This is usually like five inches above the max.
This little narrow spot is often overlooked.
Sometimes the sinks are way back here, but just the narrow spot is... Richard: So you shaded to the front so it's easier access here.
Jackie: Exactly.
The drain is offset or in the back so that you can do that.
Richard: Oh, that little extra space.
Jackie: You'll notice that the spout is a little bit higher than -- is higher on the deck.
It's not a very low spout, and that way you can get a basin of water in and out if you ever need to.
Richard: Yeah.
Jackie: It's a lever handle, which is very easy to use, and Caffrey will probably have a motion-sensitive.
Richard: That would be great.
Alright, so toilet is comfort height.
Wheelchair height.
Jackie: Yeah.
The toilet is motion-sensitive.
-[ Toilet flushes] -Richard: Wireless.
Jackie: [ Laughs ] Richard: That's great.
It can be anywhere you want it to be.
That's terrific.
Jackie: Absolutely.
Richard: And I like this, too.
So, this is interesting.
It feels like it could be a shelf that I can rest my arm and elbow and then pull.
That's great.
Jackie: Yeah.
Richard: Plenty of grab bars here.
Jackie: Yeah.
And this is helpful if somebody -- actually if somebody is walking around into the shower space, but also if there's somebody that's helping the individual in the shower, you know, they can easily hold on while they're assisting with his feet or wherever.
Richard: So, plenty of stuff on that wet wall.
Jackie: Definitely.
Richard: I love seeing this -- a big lever control instead of a knob, which is often hard to articulate.
It's easy to just move that lever or even this way.
So that's great.
Jackie: Right.
And you need like three inches between things.
Richard: Yeah.
Jackie: These grab bars are configured in this way so that this gentleman who has a bit of a hard time reaching forward or with his balance can first push up here, can pull here and then pull on here.
Richard: Great.
Jackie: Yeah.
Richard: And I love this.
The hand shower can be here, but it looks like can also go down low if you wanted, even more function.
Jackie: Yeah.
So you can get the water force that you wouldn't want when you're rinsing out your face cloth, you know?
And it's here actually, too, because when it's here and the individual's sitting here, they can use two hands to wash their hair or they can reach it.
And this easily slides up and down.
Richard: And this floor is pitched and there's no curve.
So now a wheelchair can work its way in here.
Jackie: Absolutely.
Richard: So all this has to be waterproof material, right?
All membrane and waterproof?
Jackie: Exactly.
Yep.
So if you notice, this grab bar has an extra rail for the towel.
Richard: So that's actually pretty smart because if you had a towel right here, you could slip off of it, and that leaves it down below.
Jackie: Absolutely.
Richard: Out of the way.
Jackie: There's a few companies that make that now, which is great.
Richard: Well, you've thought of everything in here.
How did you get into this?
Jackie: My background is in occupational therapy.
Richard: Okay.
Jackie: And we deal a lot with functional tasks -- you know, how much reach, range, balance, strength and all those factors that go into functioning and doing everything during the course of a day, even perception and sensory issues and cognitive and memory issues, and all of that goes into the design of, in this situation, of a space.
Richard: So you worked with the people and you saw there was a real niche to help do this in residential applications?
Jackie: Yeah.
Hence the customization, you know, because this bathroom is great for Bob, but it's not going to work for maybe somebody else, and Caffrey's will work just for him and through the years, too.
That's the important thing.
Richard: That's right.
Jackie: Yeah.
Richard: Well, we are glad that you're on our team.
Jackie: Thank you very much.
Richard: Thank you so much for showing us how it's done.
Jackie: Thank you.
♪♪ [ Tool whirs ] Kevin: The second half of that original ridge beam is now out.
So there is a clear opening running the full length of this original building.
So 46 feet from that brick wall to this brick wall.
And, Charlie, did you order that?
Charlie: I did.
Kevin: Right there.
So now that this is out, the old one's out, what's the process for getting the new one in?
Tom: Well, the old ridge beam, as you can see, went underneath all the rafters, and the rafters just met and came together with a small collar tie.
What we need to do, because the height of the new ridge beam, because it's carrying a lot more weight, it has to be bigger and thicker.
Kevin: So that means you're going to go up into the rafters and connect them to it as opposed to... Tom: Up into the rafters.
Kevin: ...have them lay on it?
Tom: It's going to go actually above the roof system.
And the good thing is that we have an insulation system that's going to cover the part that's going up in the roof and we want the bottom right here resting on the brick.
Charlie: Yeah, I mean, typically you try to put a beam in from down below, but almost 46 feet, and three of them about 460 pounds each.
Tom: We're going to actually drop it in from the top because you can't get 46 feet in here.
And number two, it's very heavy.
Kevin: Yeah.
Tom: And to split the load in thirds, we're going to do it in three separate pieces.
Kevin: So one end rests on that brick wall.
The other one, I presume, is right there?
So you got a little nub that's got to come out?
Tom: Yeah, we got to cut this out.
[ Tools whirring ] [ Clanking ] [ Tools whirring ] Kevin: There it is.
Tom: There's that piece out.
Kevin: So how do you feel about that pocket, Charlie?
Good enough for the new beam?
Charlie: I love the pocket, but we have a lally column with a plate on it.
Kevin: Oh.
First time seeing that?
Charlie: It is.
Now I have no worries at all.
Kevin: Oh, good.
Alright.
Belts and suspenders.
Tom: Nice.
♪♪ Kevin: Have to come to me.
♪♪ Keep coming.
Perfect.
Perfect.
Tom: Now, you see right here, what we have to do is you see this line right there?
Top line.
The top line.
We have to pull these rafters up to meet that line.
When we do that, we can screw that.
Kevin: One at a time?
Tom: One at a time.
♪♪ ♪♪ ♪♪ ♪♪ ♪♪ Kevin: Alright.
A bit more work to do.
We've got some more framing to do.
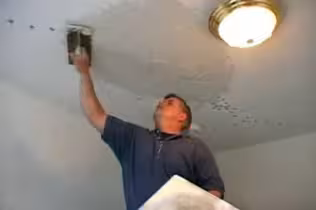
We've got to start rebuilding the center part so that we can bring this house back together, get it weather-tight, and we have got a lot of mechanicals to fit into this house.
So that was a big day.
Tom: It was.
Kevin: Alright.
Well, until next time.
I'm Kevin O'Connor.
Tom: I'm Tom Silva.
Richard: I'm Richard Trethewey.
Jenn: I'm Jenn Nawada.
Charlie: And I'm Charlie Silva.
Kevin: For "This Old House" here in Lexington, Massachusetts.
Richard: Well, she's not exactly beautiful right now.
Jenn: She's going to be beautiful.
Kevin: Next time on "This Old House"... Tom: We're framing a new section of the roof, installing a glass wall with four windows and a sliding door.
Kevin: We've got a 33-foot steel beam coming in.
It's structural, but it'll also give the front of the house a modern look.
Tom: And now they can start framing the roof.
Charlie: Yeah, it looks real sleek.
Richard: And drilling begins today on the geothermal system that our homeowners in Lexington have decided on.
I'll show you exactly how they work.
Kevin: That's next time.


- Home and How To

Hit the road in a classic car for a tour through Great Britain with two antiques experts.


Support for PBS provided by:
Funding for THIS OLD HOUSE is provided by The Home Depot and Renewal By Andersen.