E11 | Speakeasy Hidden Door | Ask This Old House
Season 24 Episode 11 | 23m 42sVideo has Closed Captions
How to use a toilet flange repair kit; gas mower maintenance; installing a hidden door.
Richard Trethewey shows a clever toilet flange repair kit that eliminates the need for a wax ring and has a rubber seal that adjusts to any flange height, making bathroom floor updates easier. Then, Lee Gilliam and Kevin O'Connor share essential upkeep to keep a gas mower running like new. Nathan Gilbert helps a homeowner turn a bar closet into a mini speakeasy with a hidden bookcase door kit.
Problems playing video? | Closed Captioning Feedback
Problems playing video? | Closed Captioning Feedback
Funding for Ask This Old House is provided by The Home Depot, Renewal By Andersen, and ChipDrop.
Support provided by:


E11 | Speakeasy Hidden Door | Ask This Old House
Season 24 Episode 11 | 23m 42sVideo has Closed Captions
Richard Trethewey shows a clever toilet flange repair kit that eliminates the need for a wax ring and has a rubber seal that adjusts to any flange height, making bathroom floor updates easier. Then, Lee Gilliam and Kevin O'Connor share essential upkeep to keep a gas mower running like new. Nathan Gilbert helps a homeowner turn a bar closet into a mini speakeasy with a hidden bookcase door kit.
Problems playing video? | Closed Captioning Feedback
How to Watch Ask This Old House
Ask This Old House is available to stream on pbs.org and the free PBS App, available on iPhone, Apple TV, Android TV, Android smartphones, Amazon Fire TV, Amazon Fire Tablet, Roku, Samsung Smart TV, and Vizio.
Keep Exploring


This Old House Insider Newsletter
Get This Old House exclusive stories, tips, and behind-the-scenes information delivered right to your inbox every month.Providing Support for PBS.org
Learn Moreabout PBS online sponsorship♪♪ Kevin: On "Ask This Old House," our experts travel across the country to answer questions about your house.
♪♪ Today, Richard will show us how to make an old toilet fit properly on a new tile floor.
Then, Lee offers some useful maintenance tips that will keep your gas-powered mower up and running.
Something that an average homeowner can do?
Lee: I think so.
I really do.
Kevin: And have you ever wanted to add a secret door to your space?
Nathan will show you how.
♪♪ Nathan: Nice.
Kevin: On "Ask This Old House."
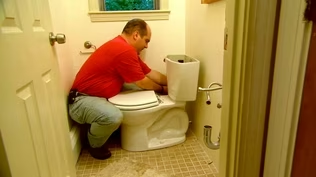
♪♪ Kevin: Hey, Richard.
Richard: Hey, Kevin.
Kevin: Funny finding you by the toilet.
Richard: Well, I thought we'd talk about one of the most important seals in the entire house, and that's underneath the toilet, between the toilet bowl and the flange.
Kevin: Something most people probably never see.
Richard: Absolutely.
And it's a seal that's challenged all the time.
You know, the toilet can rock or the floor can rot away, so I thought we'd look here to see what's underneath in the place you don't see.
Kevin: Okay.
Richard: Okay?
So, here's the standard -- this happens to be PVC, but this is called a closet flange, a toilet flange.
But in an older building, it could be cast-iron, it could be -- could be stainless steel.
It'll always have these two bolts and have a wax seal.
Kevin: And this is actually connected to the plumbing.
Richard: It's connected to the plumbing, the pipe itself, the drain pipe, but it's also connected to the building.
It has to be really secure because this is the critical thing.
You don't want to trust the pipe.
You want to trust the building to hold the torque of that toilet.
Kevin: Okay.
Richard: So, bring that toilet in.
I'll just show you.
So, on the bottom is the horn of the toilet.
We need to make a nice tight seal against sewer gas, and so that would sit here, and that would then compress right against the air and make a nice tight seal.
But it's only going to be as good as the connection, because if you wiggle the toilet enough, that wax seal gets deformed.
Kevin: Yep.
Richard: So, now that's perfect for the typical flange.
But now sometimes the floor has been rotted.
You'd like to get some new plywood in there.
You'd like to raise the grade or, in my own case, I wanted to get rid of the threshold.
So I wanted to add some -- some underlayment, some 3/4 of an inch.
So I came on top here... Kevin: Are you doing a renovation without Tommy's permission?
Richard: Don't tell him, please.
Okay.
So, now, bring it back in.
So you might be able to do this.
And they make a wax ring with a horn.
That'll give you about 3/4 of an inch.
So this is on the edge of being able to be a tight seal.
Okay?
Now, what happens, though, if you want to go a little higher?
So if you now go here.
So now it's got a big gap.
What we did, historically, was to add these flange shims.
If you're gonna put them together, you could actually glue them because they're not gonna be watertight otherwise.
And now you could do your build-up.
Kevin: Pick as many as you need.
Richard: Pick as many as you need, okay?
And then you could use a conventional... So, go ahead.
Kevin: Yeah.
Richard: ...wax seal.
Kevin: You get in tight there.
I will point out, Richard, originally, your bolts were coming through... Richard: Correct.
Kevin: ...which allows me to secure it down.
They are no longer coming through.
Richard: Right.
So there's a limit.
Now, what I want to introduce is an interesting kit that I saw.
It has a flange like this and has a wax seal right here.
Now, I want to do one thing before I do this.
This system comes with longer bolts.
Kevin: Can I see that?
Richard: Yeah.
Kevin: Just so I understand how that works.
So, on the bottom, you've got sort of that rectangular shape which allows you to put it in, slide it into place, and then, when you turn it, it doesn't pull up.
Richard: It has a plastic tab right here, which is really important.
These things hold these things perfectly so that when you bring the toilet down, they're not flopping around.
We come down over the top.
So, now, bring that in, and watch what happens.
You see it?
Kevin: Oh, yeah.
Richard: You've got a sort of a shock absorber keeping a tight seal, no matter what happens up here.
But you've got a positive seal at the bottom.
Now, you can secure this down.
Kevin: Because I've got the bolts that are now coming through 'cause you extended those.
Richard: That's right.
Kevin: You can cut them if you have to.
Richard: You just take a saw and cut them off at the right height and put the caps on.
Kevin: But then you could finish it off nicely.
Richard: So, with this, if you're gonna have as much as an inch or inch and a half build-up, this is really a perfect solution.
If you've got smaller, then you could use -- if this is a 1/2-inch or 3/4 of an inch in concert with these flanges are fine, but this is a really good innovation.
It's a good way to solve it, 'cause otherwise, you'd have to ask a plumber to come, cut the pipe, make a new connection underneath it, or adapt it to raise that grade.
Kevin: Yeah.
And how are you gonna find a plumber?
Richard: You can't find a plumber.
I have caller ID when you call me.
Kevin: I won't tell Tommy you're freelancing.
Thank you, Richard.
Richard: All right.
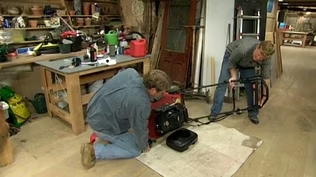
♪♪ Kevin: Hey, Lee.
Lee: How you doing?
Good to see you.
Kevin: Doing all right.
Same here.
Lee: How you doing here?
Kevin: Oh, look at this.
Lee: There we go.
Kevin: Lawnmower maintenance?
Lee: Yes.
So, we always have issues because these things have been sitting in the garage or in the shed.
So we have a fuel issue we might have to look at.
Air cleaner issues, things like that, spark plug issues.
Kevin: All the things that come with a small engine.
Lee: Yes.
Snow blower, weed whacker, you know, even the gas blowers.
Anything with gas that has carburetors.
Kevin: Okay.
Where do you want to start?
Lee: So, there's three things that make these things start up.
Fuel, a spark, and also air.
Kevin: Nice.
Lee: Okay?
Kevin: So the same for every small engine.
And I guess if I've got one of these at home, I want to think about keeping it in good shape.
Or if it's not running... Lee: Yes.
Kevin: ...how do I fix it myself?
Lee: Yeah.
Do some troubleshooting.
Kevin: All right.
Lee: So what I like to do is check the air filters.
Kevin: It's probably the easiest, most straightforward thing you can do.
Lee: Correct.
Yep.
So, the engine has to breathe.
Look at this.
This is brand-new, so we know that.
Kevin: Beautiful, right?
That's exactly what... Lee: That's what we want it to look like.
Kevin: Not gonna look like this after a season or two?
Lee: Correct.
It's gonna be gray, it's gonna be dirt, you know, so just blow it out, you could, if you want it, or you could just get a new one.
Kevin: Okay.
Lee: Okay.
So we have that.
And then underneath that is our carburetor.
Kevin: So, this is the fuel tank.
Lee: Correct.
Kevin: But eventually, it's actually going into that carburetor because that's where all the business is happening.
Lee: Yes, gives it fuel for the engine to run.
If you have an issue with it, you might want to loosen it up.
There's a bolt under here.
We loosen that up and drain out the gas that's in the bowl.
Kevin: Fuel's kind of an issue, especially these days.
Lee: It is.
Kevin: Right?
Lee: So, you have stabilizers that are really good to put in so you're not having issues like this.
See the separation from the moisture that's in the fuel?
Kevin: Kind of like a gel on the bottom.
Lee: Yes.
Kevin: Um, and then something a little thinner up on top.
Lee: Correct.
Kevin: That is fuel that's separated.
That's not gonna run, and that's gonna gunk up your machine.
Lee: Exactly.
Kevin: And that's happening why?
Because there's water?
Lee: There's water.
Condensation, water.
Just moisture in the air.
Kevin: Okay.
Lee: And it also could have a little bit of water in your gas tank, so you got to change, you know, your fuel tank.
Kevin: Yeah.
This is a thing with our fuel these days, right?
They've added the ethanol.
Lee: Yes.
Kevin: So you got a solution to prevent that?
Lee: Yes.
We have -- We have stabilizer.
Kevin: So, this is good fuel right here.
Lee: Yep, that's good fuel.
That's what -- That's what I want it to look like.
Kevin: Yeah.
Lee: Okay.
And you can have stabilizer you can put into it.
Kevin: You want to mix some?
Lee: Sure.
Let's try it.
Kevin: Gonna open this up here.
They got ratios for this -- you know, how many ounces to a gallon.
But just to give a sense of what's going on... And so the combination of those two hopefully is going to prevent this from happening.
Lee: Correct.
Kevin: Beautiful.
I like that.
Although you know what I like even more?
I got to tell you, I'm partial to this stuff.
Lee: You like this stuff?
Okay.
Kevin: I do.
So, like, on my backpack blower, I don't use it that much.
It's sitting there a lot.
Lee: This works really well.
Kevin: And so this is, uh... Lee: Ethanol-free.
Kevin: Yeah.
Lee: Yeah.
So you're not gonna get the gelling up.
Kevin: Gallon for gallon, a lot more expensive.
Lee: Yes.
Kevin: But if it prevents this from happening or from that, from gunking up, could be worth the price.
Lee: Yes.
Kevin: Beautiful.
Lee: Totally.
Kevin: All right.
So, on the carburetor, if we get the separation or we get buildup and the thing stops working, can I fix it?
Lee: Sure.
Look at this big cutout we have here.
Obviously, it doesn't go with this, but this is all the moving parts.
Kevin: So, you hold that right there.
Lee: I'm gonna hold that for you.
Kevin: Yeah.
Lee: Okay.
Kevin: So look at this.
Lee: Yep.
So, this would be the choke.
Okay?
Kevin: So, you open this, it lets more air in.
Closes it down... Lee: Correct.
Kevin: ...boom boom boom boom.
And then how do the floats work?
Lee: The floats go up and down by the fuel that the -- that you're asking for.
Kevin: Right.
So that's gonna tell us how much is in the well, if we need more.
Lee: But it has -- it has these jets.
So these jets and ports have to be cleaned.
Kevin: What are we suggesting?
Dump this out and start cleaning?
Lee: Dump this out.
Correct.
Dump that out in a container.
Maybe have to take it back to your gas station, local gas station, they'll take it.
Kevin: So, that's it poured out.
Lee: Yeah.
Kevin: This coloration.
And, I mean, I can see it.
There's actually some granular grit in the bottom there, too.
Lee: Yep.
Kevin: That can't be good for the operation.
So once I dump all that out, you're telling me that these, you know, little stems like this, little holes like this, need to be cleaned?
Lee: Correct.
Kevin: 'Cause the fuel's actually blown through there.
Lee: So you can have a little brush like these.
See the brush?
That cleans those out really well.
Kevin: Pipe cleaner brush.
Lee: Yep.
Kevin: Get that cleaned out.
Lee: See that?
Yep.
Clean out those ports.
Kevin: Okay.
Lee: And then let's put some -- put your glasses on.
And I'm gonna shoot some of this carburetor cleaner, which evaporates really quickly, and that cleans out real good.
Kevin: Carb choke parts and cleaner.
Look at that.
Lee: See that?
Kevin: It's gonna blow the gunk out.
Lee: Correct.
Kevin: And, hopefully, you get this nice and clean, you get those ports cleaned.
We're putting this guy... Lee: Back together.
Kevin: ...back together.
Lee: Yep.
Kevin: Back into your mower.
I'm not gonna screw that back together, but I will just set it down.
Richard: Okay, great.
Kevin: So, fuel, air, and you said the third thing is spark.
Lee: And look what gives us spark.
These spark plugs.
Kevin: Okay.
Lee: So, this one here, brand-new.
That's what you want them to look like.
What do you think?
Kevin: Clean.
Lee: Yep.
Kevin: No buildup.
And I'm looking at the -- the little arch right there and a little copper below.
There's a little gap.
That's what we want, right?
'Cause that creates a little arc.
Lee: That's the look.
That's the look we want.
Kevin: Okay.
Lee: This one here has a little bit of buildup on it.
And when we say buildup, we're talking carbon.
Kevin: So, the fact that it is dark and dirty.
Lee: Yeah.
Kevin: Can that be cleaned, or is this one toast?
Lee: You can probably get away with cleaning this one, okay?
But I have another one here that I think would be toast.
I think that one there would... Kevin: Way more buildup there.
Lee: Way more buildup.
Kevin: You think this one has served its purpose and off it goes.
Lee: Exactly.
And then sometimes they come damaged, and this one doesn't have that arc on it.
So that one there, I would take it to your small-engine repair because it could be lost inside the motor.
Kevin: So, that right there is missing.
And if it's not here, it could be over there.
Lee: Exactly.
Kevin: Beautiful.
Lee: Let me steal those.
Kevin: Yeah.
Lee: And then, there's a tester for these.
Okay?
I'm gonna walk you through it.
We're gonna talk about it, okay?
So what I would do is, you plug this on the spark plug.
Kevin: So, this is a plug in my mower.
Lee: Yes.
Kevin: And in there, it's got a cap.
Lee: And then we're gonna replace that with this.
Okay?
Kevin: All right.
Lee: All right?
And then we're gonna start the engine, and that light should glow.
Kevin: So, if we put the cap back on there, we're basically -- have got the same circuit.
Lee: Yes.
Kevin: Except this now interrupts it.
Lee: Mm-hmm.
Kevin: And what happens?
Lee: This light inside here is gonna glow.
When that glows, that means this plug is good.
So we're good there.
Kevin: So, if I'm pulling the cord, the machine's not working, I suspect it's the spark plug, I could put this on.
If I get a light, it tells me the spark plug's good.
Problem somewhere else.
Lee: Problem somewhere else.
Kevin: Ooh!
That's pretty sexy.
Lee: Okay.
Kevin: All right.
Lee: And the other thing we have is oil in here.
Kevin: Which is not part of the gas mix.
Some people confuse that.
Oil is just for... Lee: Oil's for the lubrication of the engine.
That's all it is.
Kevin: Okay.
Lee: All right?
And then we have some samples over here.
What it -- what it looks like after a year or so in the engine.
Kevin: That's dirty.
Lee: Dirty oil.
Kevin: You can't even see through it.
Lee: Correct.
Kevin: Whereas the good stuff... Lee: Brand-new oil.
Kevin: Dark but translucent, right?
Lee: Nice color.
Kevin: So, this eventually becomes this with use.
Lee: Yes.
Kevin: How frequently do I want to change it out?
Lee: If I'm using it once a week, maybe even twice a week, I want to use -- I want to change it once a year.
Kevin: All right.
Lee: And then some machines, this particular one does not have it, but some machines have an oil filter.
Kevin: Right.
Lee: Okay?
So that should be changed.
So I would suggest to, you know, stock up with a couple of these.
Kevin: Yeah.
Would you change the filter every time you change the oil or...?
Lee: Yes.
Definitely.
Definitely.
But the trick on these, Kevin, if you flip it around, there's a gasket on here.
I don't want you to put the gasket on dry.
Okay?
What I want you to do is, take your finger, rub some oil on it, and then put that on.
Okay?
Because if it's on dry, it will be almost impossible to get it off.
Kevin: How about if I take your finger and I put some oil...?
Lee: You can do that.
[ Both laugh ] Kevin: But we're gonna change these every once so often because they get dirty, as well?
Lee: Correct.
Kevin: Okay.
So I guess the big question is, Lee, do you think, um, all of these steps, preventative and repair, is something that an average homeowner can do?
Lee: I think so.
I really do.
I really do.
You can do it.
You know, just take your time.
You know, Saturday morning.
Kevin: They're pretty simple, and they haven't really changed.
Lee: Haven't changed in over 100 years.
Kevin: Good deal.
Lee: You know?
Kevin: All right.
Well, if that's the case, then, I'll make sure I bring mine down and have you get after it.
Lee: We'll figure it out.
Thanks.
Kevin: You got it, Lee.
Thank you.
♪♪ ♪♪ ♪♪ Nathan: Hey, Brett.
Brett: Hey, Nathan.
Nathan: Nice to meet you.
Brett: Nice to meet you as well.
Come on in.
Nathan: Beautiful spot you guys have here.
Brett: Thank you.
Yeah.
Beautiful home, beautiful neighborhood.
It's an '80s-style Cape home.
Nathan: Nice.
Brett: Looks pretty basic.
Nathan: Yep.
Brett: Um, and we like to add some creativity and unique spaces to our home.
Nathan: And you wrote in about a pretty cool idea.
Brett: Yeah.
So, come on over here.
So, in behind this wall here is just your basic closet.
Nathan: Okay.
Brett: But we want to put in a bookshelf and turn this into a classic speakeasy.
Nathan: So, like, some hidden doors?
Brett: Yeah, exactly.
Nathan: Mind if I take a look?
Brett: Go on in.
Nathan: All right.
You guys have been busy in here.
Brett: Yeah.
Nathan: This is looking good.
Brett: We had it all cleared out and had an electrician come by and kill all the power.
Nathan: Yep.
Yeah, no plumbing in the wall here.
What did this look like before?
Brett: Oh, yeah.
Let me give you a quick look.
So, this thing -- this space was pretty packed.
It was a proper bar.
You can see all our barware in the back.
We even had some beer steins for hosting our Oktoberfest in the fall.
Nathan: Fully stocked.
Brett: Yep.
So it's gonna be fun to change this over into a speakeasy now.
Nathan: One concern I have, though, is for framing.
Is this a load-bearing wall at all?
Brett: It's not.
We actually had a structural engineer come by and inspect it.
Nathan: Okay.
All right.
Great.
That's gonna make the framing a lot easier for us.
Let's go to the other side and take a look.
Yeah.
So this is a nice wall to put on a hidden door right here.
What size are you thinking?
Double or single?
Brett: We'd prefer to have a double door.
We want to be able to open it up and kind of walk in.
Nathan: All right.
So, double door, swinging out.
Probably could fit... Um, that's about a 6-foot kit right there.
That's a really nice width.
And then we'll check the height.
It'll probably finish somewhere around 6'8".
Brett: Okay.
Nathan: Which is about there.
So I think that would fit well under that beam.
Brett: And we'd like to, um -- we'd like to be able to paint it and kind of blend it into the wall in the room.
Nathan: So, I actually have a kit in mind.
I'm gonna go pick it up, and we'll get started.
Brett: Great.
♪♪ Nathan: All right.
Let's get started with our layout.
The kit that I picked up is 70 inches wide, 80 inches tall, but the rough opening called for is 72 inches wide and 82 inches tall.
I'd like to center it in this wall.
So let's get started there.
All right.
So we've got 92 3/4.
So let's go 46 3/8.
Brett: Okay.
Nathan: And then, we'll check it coming back.
46 3/8.
All right.
So we got a good center line to work off of.
So I'm just going to make a little -- little mark here just for reference.
All right.
So that's our center line.
So, off of this point, we're gonna go 36 inches is what we need to come over.
Brett: Okay.
Nathan: So we've got 36.
And then... 36.
All right.
So let's double-check that, that we've got our 72.
All right, perfect.
All right, now I'm gonna go off our mark here.
And I'm gonna make a plumb line for the outside of our opening.
And you can plumb that side up.
Looks good.
All right.
So, now I'm gonna take my tape, and I'm gonna measure up 82 inches from the finished floor, 'cause this kit has a threshold on it, so it's gonna sit right on the floor.
All right.
So now we're just gonna connect those dots.
All right.
So, the next step that I want to do is transfer this layout to the inside.
I'm gonna pull off the baseboard, save that for later.
And we can start cutting the drywall out.
Brett: Great.
Nathan: All right.
♪♪ All right.
We're ready to cut the drywall.
I'm gonna use an oscillating tool.
We're only going to cut about a 1/2-inch deep.
I also have the vacuum set up to help control the dust.
So we'll plunge in, we'll cut out our rough opening, and pull the drywall down.
Brett: Sounds good.
♪♪ Nathan: Now we can see what we're working with.
We're going to take these typical studs out.
I'm gonna leave a little up top, but we're gonna cut that with an oscillating tool.
All right?
Brett: Okay.
How much room are you leaving up there again?
Nathan: So, what I'm doing is, I'm making a 3-inch mark up behind the drywall, 'cause we're gonna put a -- like, a non-load-bearing header in here, just two 2x4s on the flat, which is really just gonna support the trim or any drywall.
So I'm making a 3-inch mark.
We'll take the oscillating tool, and we'll cut up there, and that header package will tuck up inside.
Brett: Got it.
Nathan: Now that we have those laid out, I'm gonna make a quick relief cut down here at the middle point, and it's gonna make it easier to pull those out after you cut them.
Brett: Sounds good.
Nathan: All right.
All right.
So, I brought along this framing mock-up to show you what we're gonna be doing 'cause everything is gonna be tucked in and behind the drywall, so it's kind of hard to see.
But let's start at the bottom.
We got our bottom plate, which is still there.
We're gonna be introducing a king stud and a jack stud.
The jack stud will support our header, which we're gonna put in there up behind the drywall.
And remember when we made all those cuts?
Brett: Yep.
Nathan: There's our typical stud, or our common stud, which we turned into a cripple stud.
And then we have a double top plate, which is up there.
So we're gonna be framing from the bottom up, putting the king stud and the jack stud together, putting the header in, creating that rough opening we need.
After we have that framed, we'll cut that bottom plate out, and we'll be ready to put the door in.
Brett: I didn't realize there were that many names of all the different studs.
Nathan: Lots of little parts and pieces.
All right, now we're ready to start framing our rough opening.
I have all the pieces cut.
I'm gonna start by putting in my king stud on either side.
This is the stud that's gonna go from the bottom plate all the way up to the top plate.
I already have it cut to length.
So it's gonna be a little tricky, but we're gonna get it in there.
We're gonna screw that down.
I'm gonna go put the king stud on that side.
Then I want to get my header in.
Brett: Okay.
Nathan: Then I'm gonna put the jack studs underneath.
So that way we don't have to fight the header later.
Okay?
♪♪ That first line is with the drywall.
That's gonna be where our jack stud goes.
♪♪ All right.
Now we're ready to put our header package in.
Yeah.
So we'll put them in one at a time.
Second header.
♪♪ ♪♪ All right.
Now we're ready to cut and remove our bottom plate.
♪♪ Pull down.
You pry up, and I'll go down.
♪♪ All right.
Here we have our hidden-door kit.
Comes broken down, but it has everything we need.
Let's start at the bottom.
Here we have our threshold.
It's going to attach to our jamb that's broken down, as well.
So we're gonna put our kit together left leg, right leg.
We have a header going across the top, lock everything in.
We have these hinges at the top and the bottom that have pins, so we'll need to align those onto the doors.
We'll just assemble everything and then put it into place.
Brett: Sounds good.
Nathan: All right.
Try and get these pins in.
And then I'm going to get the glue and the screws, and we're going to fasten things together.
We're going to watch that pin.
We're going to watch that dowel.
All right.
Now let's see if it fits.
Brett: Sounds good.
Nathan: All right.
Nice and level, perfectly plumb.
You got these cedar shims ripped to 2 inches.
We're going to tuck in a fat end and then a skinny end.
Put it into that void right there until it fills that space perfectly.
We'll screw right through that.
So we're going to go top, middle, bottom.
♪♪ No, I think that looks nice.
You're gonna be able to put a lot of books on that shelf.
Brett: [ Laughs ] Nathan: Nice.
All right.
So the right one goes in first.
Nice latch.
Second one goes in, sets it.
All right.
I think you're good to go.
Brett: Looks great.
Works perfectly, and it's exactly what we wanted.
Nathan: Awesome.
Glad you're happy.
But now we got to take everything off.
Little bit of primer, little bit of paint, whatever color you like.
Brett: Okay.
Nathan: And I think you're good to go.
Brett: Sounds great.
Nathan: All right, enjoy it.
Brett: Thanks, Nathan.
Nathan: See you later.
♪♪ ♪♪ Kevin: Next time on "Ask This Old House," Mauro teaches a homeowner how to paint their ceiling.
Mauro: And you're gonna get really close to the crown.
Now you go back and you spread the paint.
Kevin: Then, Nathan discusses the options available in home siding.
And do your floors squeak?
Tom: Boy, that floor has a lot to say there, doesn't it?
Kevin: Tommy helps a homeowner make his floors nice and quiet.
All that on "Ask This Old House."


- Home and How To

Hit the road in a classic car for a tour through Great Britain with two antiques experts.


Support for PBS provided by:
Funding for Ask This Old House is provided by The Home Depot, Renewal By Andersen, and ChipDrop.